Homemade Lightbox For Product Photography

A homemade lightbox for product photography may be the solution for us. If we want to make a cheap light box with the DIY light box for product photos or other pictures. DIY tracing table light box we can use it to shoot for our own online product shoes, goods item and clothing photography. Are we looking for an affordable way to take high-quality product photos for our online store or website? With just a few materials, we can create our own DIY lightbox that will diffuse light evenly and eliminate shadows. All we need a a cardboard box, white tissue paper, poster board, tape, and a light source. We can even make a tracing table light box for even more precision. Don’t let the cost of a professional lightbox hold we back; with a little creativity and effort, we can build our own lightbox for photography. So why not give it a try and see the difference in our product photos?

diy light box materials for homemade lightbox for product photography

To create this homemade lightbox for product photography, gather the following materials:

  • A box, such as an old Amazon delivery box
  • Tape, preferably painter’s tape for a desired look
  • Craft knife and scissors
  • Thin paper or other light-diffusing materials, such as extra-thin printing paper (tracing paper) or tissue paper
  • Thicker white paper for the background
  • Pen or pencil for marking and cutting

How to Make a cheap light box

11 steps to build our own lightbox for photography

Step 1: Construct the box by assembling its parts.

Assemble the main structure or shell of the lightbox by either obtaining a pre-made box or constructing one from cardboard pieces that are put together in a box shape.
Our photo background will be contained within a box. Opt for the largest box possible, as it enables, we to capture objects of varying sizes. 

In case a cardboard box is not readily available, we may construct our space using robust materials. According to Nocero, “I prefer using foam core poster boards to build the frame of the box, but any type of cardboard that can hold a white surface will suffice.

Step 2: Use tape to firmly fasten and secure the edges of the box.

Using tape to firmly fasten and secure the edges of the box means attaching and sealing the edges with tape to create a strong and durable structure that will keep our items safe during transport or storage.
Next, indicate where we want to create the window openings. We’ll need to cut three sides, specifically, the box’s top for the key light and two sides for the primary lights. Trace the outline of the cutouts and label the panels with an X. This approach will prevent we from making uneven cuts later or, even worse, cutting the wrong panels.

Step 3: Use a craft knife or scissors to carefully cut out the windows on the sides of the box.

Using a craft knife, cut out the windows, leaving a thick border around the perimeter. Make sure to keep the cutout pieces as we’ll require them at a later stage. Proceed to measure and create windows on the remaining sides of the box. Take a ruler and identify a point approximately 2 inches away from each edge on one side of the box. Using a pencil, connect the endpoints to form a rectangular area with spaces near the edges. Cut out these areas using a box cutter or sharp scissors. Repeat this process on the opposite side. These windows will serve as the location where the primary light source will shine through.

Step 4: Apply additional tape to reinforce the edges of the box once again.

To reinforce the edges of our windows, use tape once again. This will help to maintain its stability.

Step 5: Trace the cutouts of the box's windows onto paper.

Utilize the cutout pieces saved earlier as stencils for the windows. Trace their shape onto thin, white material such as tissue paper that can diffuse light.

Step 6: Using scissors, cut out the traced paper shapes from the previous step.

When cutting out the traced windows, make sure to leave a border. This will enable to attach the tape later on.

Step 7: Use tape to attach the cut-out paper shapes onto the inside of the window openings in the box.

Put tape on the borders of our paper windows to attach them to the box.

Step 8: Securely attach the paper windows to the inside of the box's window openings using tape or glue.

Affix the traced paper windows onto the box. It should resemble the following illustration: Attach the remaining two windows as well. Verify if light passes through the material smoothly.

Step 9: Inspect the tape to ensure that all paper windows are securely attached to the box and won't come loose.

Verify our tape application and ensure that it does not encroach upon the window. Attempt to keep it tidy to enhance the longevity of your box.

Step 10: Create the backdrop by using thicker white paper or cardboard to form the background of the box.

Prepare the backdrop by attaching tape to the top to secure it to the box’s interior. If we prefer not to have a plain background on our product images, you can print a texture onto the backdrop before affixing it.

Step 11: Attach the backdrop to the inside of the box using tape or glue, ensuring that it is straight and secure.

Carefully attach your backdrop to the box’s interior, taking care not to crease the paper. Any tears or creases will be visible in your images. Ensure that your tape and backdrop are straight, or else the backdrop may not sit correctly inside the box.

Build and setup diy light box for pictures

03 steps to build & setup your own diy light box for pictures

Step 1: Get the lights ready for use by plugging them in and testing to ensure they work properly.

Find two light sources and place them on either side of the box. We might get away with not using a third light on the top (as shown) because the light from the sides bounces off the top window, which acts as a reflector. However, we’re welcome to use a third light source. Keep the light box evenly lit.

Step 2: Use the DIY lightbox to take high-quality product photos that showcase our items in the best light possible.

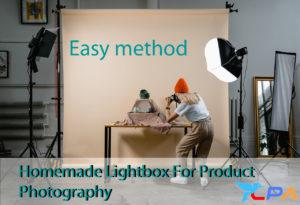
Now it’s time to take our images. Position the item at the center of the backdrop and capture our photographs.

Step 3: Edit the photos as desired using photo editing software to further enhance the quality and appeal of the product images.

After taking our photos, we can crop the sides of the image and adjust the exposure during the editing process if necessary.

References:

All images courtesy of Pexel and Pixabay sites.

Facebook
Twitter
LinkedIn

Leave A Comment